


General SEO
A technical SEO audit analyzes your website’s technical components to uncover any issues that could be impacting its potential to rank higher on search engines.
You should perform a technical SEO audit regularly on your website to ensure it’s easy for search engines to crawl, understand, and index. This typically leads to a better visitor experience, with the added bonus of boosting engagement and conversions.
In this guide, we’ll show you how to do a technical SEO audit using our 8-step process. But first…
Technical SEO involves the meticulous process of optimizing your website to ensure that search engines can efficiently find, crawl, interpret, and index your web pages. This optimization is crucial for improving the visibility and rankings of your website in search engine results.
When search engines like Google crawl your website, they use complex algorithms to assess various factors such as site speed, mobile-friendliness, and structured data. By addressing these technical elements, you help search engines understand the content and structure of your site better, which can lead to improved rankings.
In this guide, we’ll show you how to do a technical SEO audit using our 8-step process.
Your website audit should start with crawling the site, which search engines have typically done for you, provided you’ve submitted your sitemap to Google Search Console and allowed enough time to crawl your website.
Once your website has been crawled, you can find crawl data in Search Console in your Crawl stats report under “Settings”.
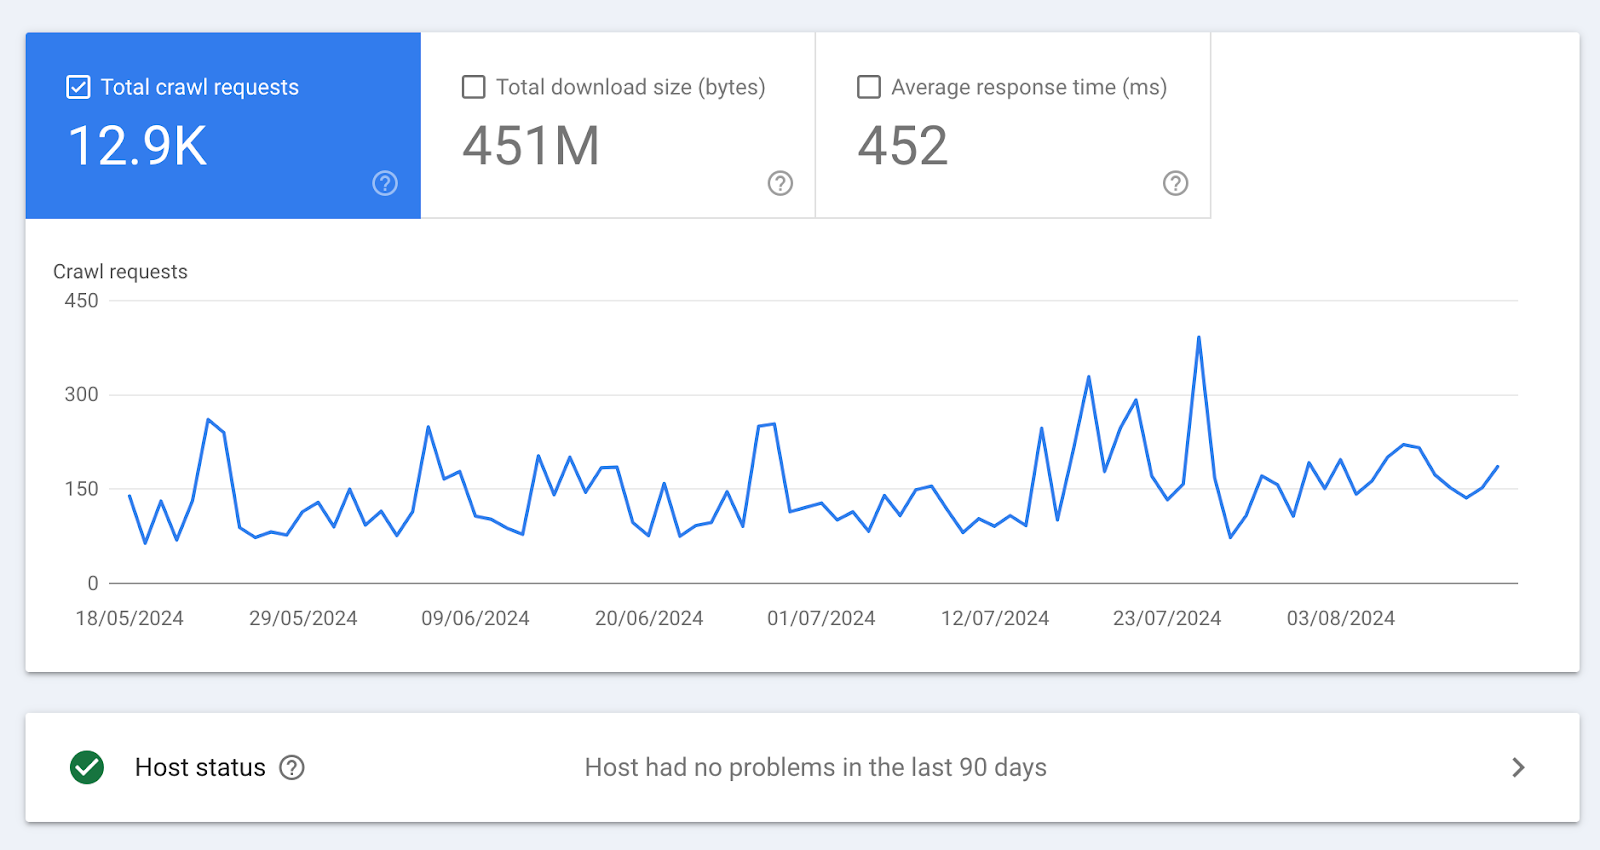
This report shows the total number of crawl requests Google has made to your website, the average response time and the total download size.
Under “Host status”, you can see if Google has had any issues crawling your website in the last 90 days. If you see any errors here, this requires immediate investigation to resolve the issues, as they can impact the crawlability of your whole site.
To investigate your crawl requests in detail, scroll down to the Crawl requests breakdown section.
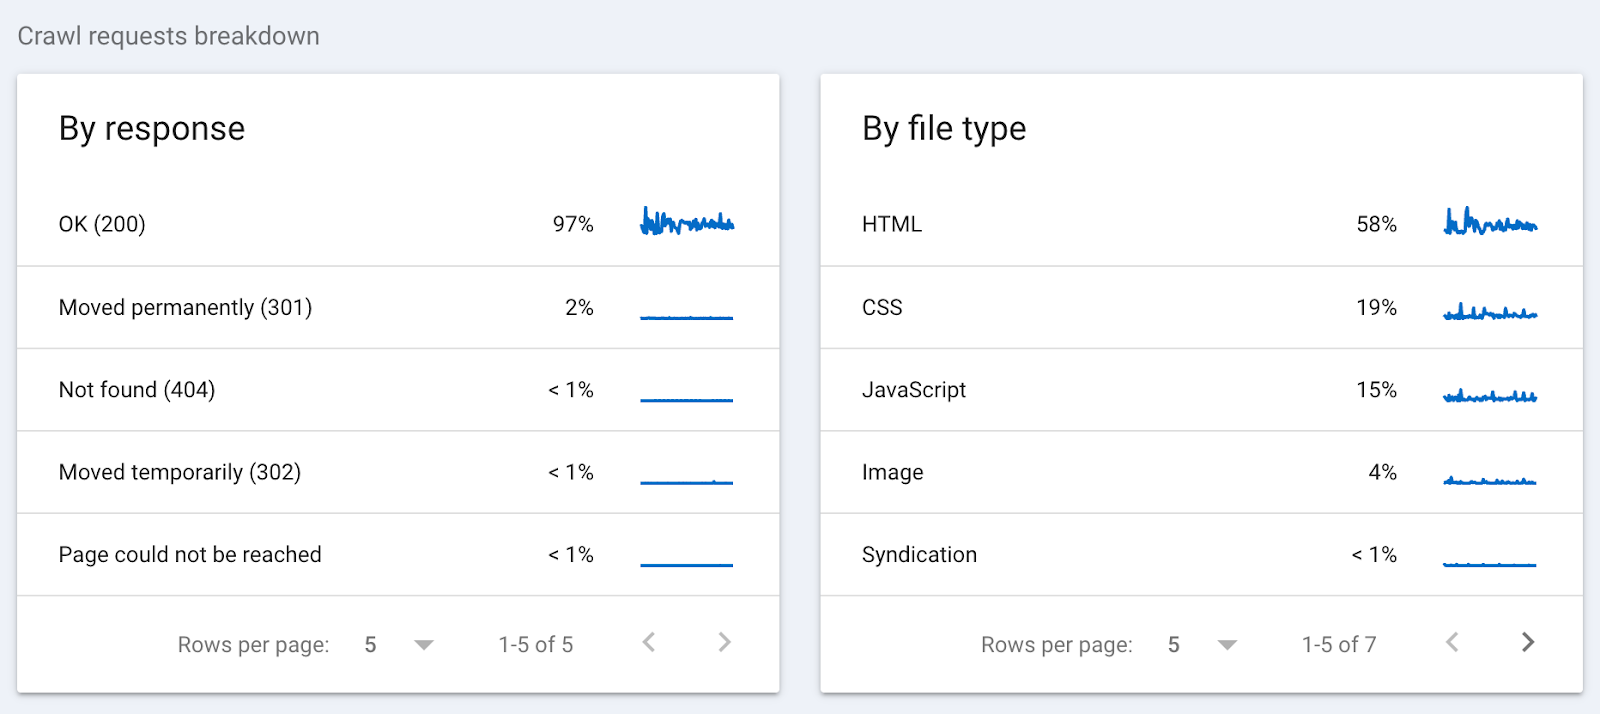
In the Crawl requests breakdown, pay close attention to any 404 errors (page not found), 500 errors (server errors), or any other non-200 status codes in this report. Investigate each page to decide if you need to take action, such as redirecting a page displaying a 404 error code to a live page.
On your “Pages” report in Search Console, you can see a full report of the pages on your site that Google has crawled and indexed, as well as any errors discovered during their crawls.
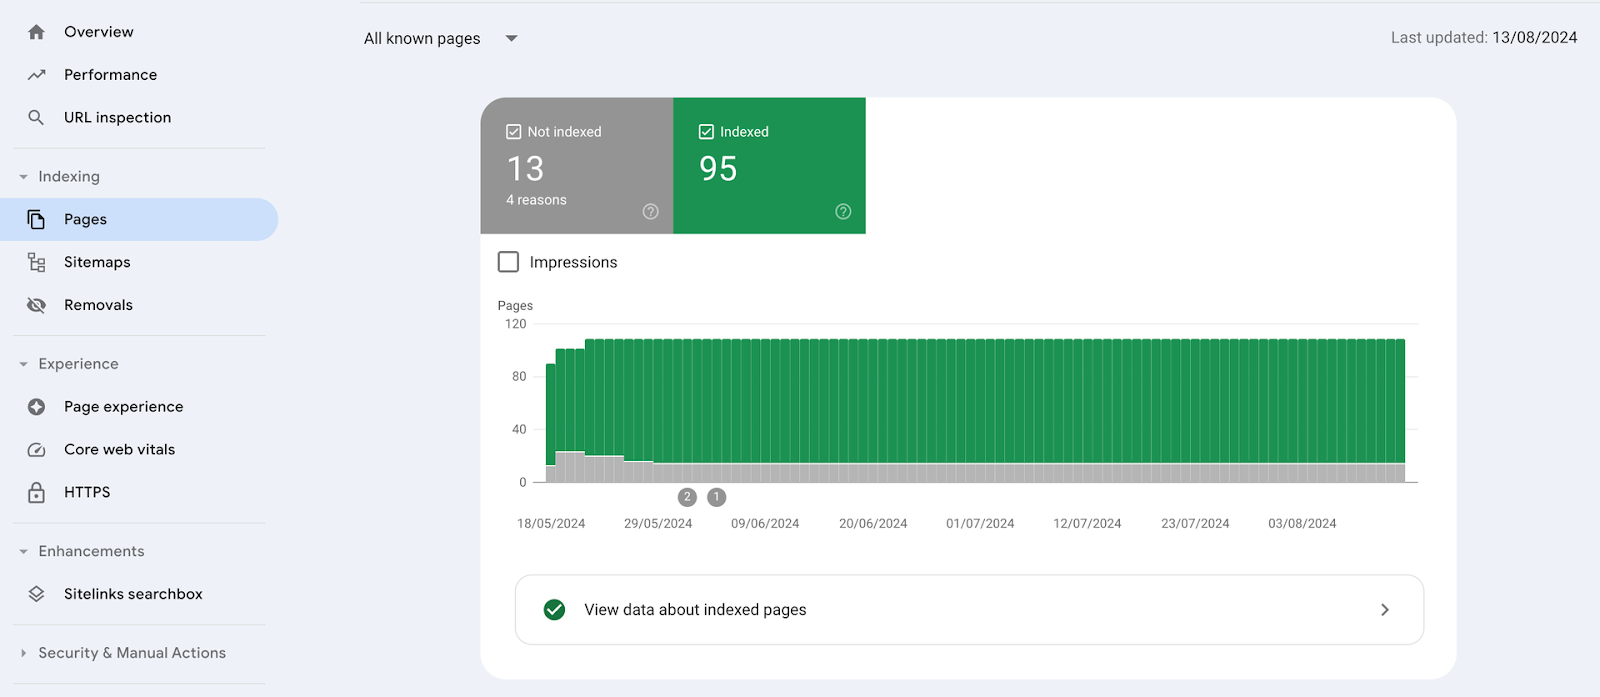
Below the data about indexed pages, review “Why pages aren’t indexed” to see any pages with potential issues impacting their ability to appear in Google’s index.
Click on each reason listed to see the pages affected, paying particular attention to reasons related to 3XX, 4XX and 5XX errors. You should also review any pages listed under reasons related to canonical URLs, redirects, duplicate content and if they’ve been blocked or excluded, to make sure this is your intention for these pages.
For example, if one of your main SEO landing pages has been excluded by a ‘noindex’ tag or blocked by the robots.txt file, your website is telling search engines not to index these pages. So if you want them to be indexed, you need to find and remove the tag or rules.
Once you’ve fixed any issues causing crawl errors, return to Search Console and request indexing for the page so Google can re-crawl the page and, hopefully, start showing it in their search results.
HTTPS (Hypertext Transfer Protocol Secure) encrypts data transferred between a user’s browser and your website, protecting sensitive information and building trust with your visitors.
Google has confirmed that HTTPS is a ranking factor, so you need to ensure that your site implements it correctly. The easiest way to get HTTPS status on your website is to install an SSL certificate, but the options and methods for installation vary depending on your website host. Some provide Let’s Encrypt as a free solution with a one-click install, and others charge annually and require a more in-depth setup.
If you’re not sure about your website’s HTTPS status or SSL certificate, you can manually check this by opening your website in a browser and looking for the padlock icon in the address bar. If present, your site is using HTTPS.
Alternatively, you can use Search Console to check for HTTPS on your pages by navigating to the “Experience” section and selecting “HTTPS”. This provides a more in-depth overview of your website’s HTTPS status, including issues that need to be addressed, even if you have an SSL certificate installed.
You can review a full list of HTTPS errors you might uncover from Google’s Webmaster Help Center, but common HTTPS issues to look out for include:
A slow-loading site can drive visitors away and negatively impact your SEO efforts. Google uses Core Web Vitals to analyze your website’s speed and gauge its overall user experience, and these stats are accessible using PageSpeed Insights.
Enter your URL and run a report to see your Core Web Vital metrics for the latest 28-day period to find areas you need to improve. The test offers a simple “Passed” or “Failed” score, which is based on the three metrics below the score:
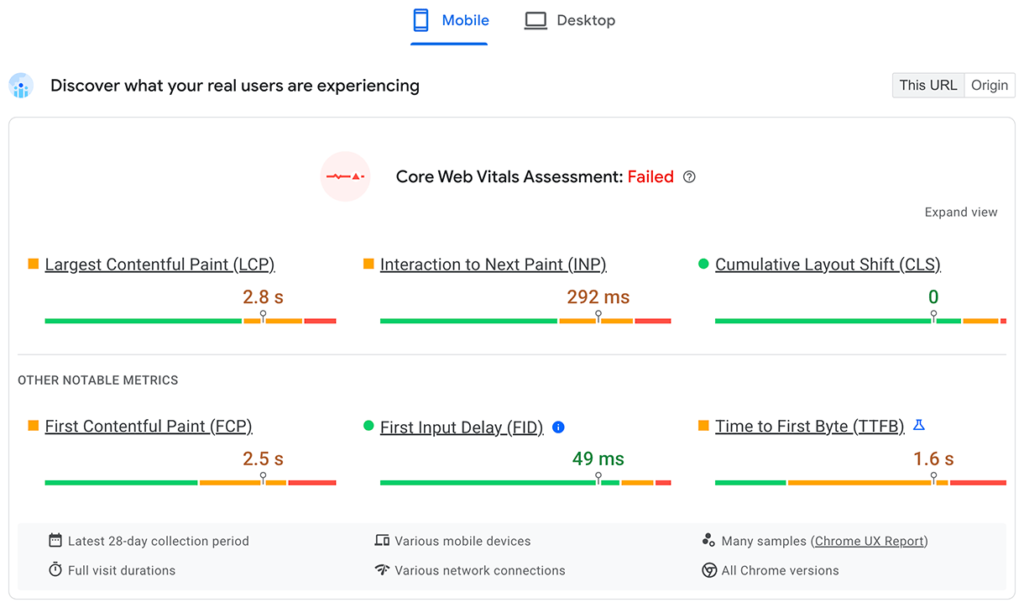
If you have failed this text, you can review Diagnostics under Performance to see what’s slowing down your website. You can also use a third-party tool like GTMetrix to see more in-depth recommendations on how to improve your scores. We advise running speed reports on both tools to find what’s slowing down your site.
Keep in mind that site speed optimization is an ongoing process. As you make changes or updates on your website, run new tests to ensure improvements are effective and to identify new opportunities.
Google’s mobile-first indexing means that your site’s mobile version is considered the primary version for ranking and indexing. Therefore, your website’s mobile version needs to be well-optimized and provide a seamless user experience.
Using the same report from PageSpeed Insights, make sure you are viewing the Mobile version of the report, then review the metrics under Performance.
Underneath Diagnostics, you can filter the recommendations based on which score you need to improve. As you action these recommendations, your Performance score should increase. Aim for a Performance score of 90+ for full confidence in your site’s mobile-friendliness.
Well-structured URLs help search engines understand your site’s hierarchy and content while also making it easier for users to navigate and share your pages. When optimising your URLs, aim to keep them short but descriptive, remove any unnecessary words like “a, “the”, etc. and implement a logical hierarchy to reflect your site’s structure.
When analyzing your URLs, your technical SEO audit may uncover issues that need addressing, such as:
If you need to update your URLs to address issues or improve their structure, always set up 301 redirects from old URLs to new ones, update internal links and the URLs in your sitemap to let search engines know about your changes and reduce the risk of losing any traffic or rankings in the process.
When you first update your URLs, you may notice a dip in visibility, but these actions help prevent this from becoming permanent.
It’s important to check your on-page SEO elements because when search engines crawl your site, they use specific elements on the page to understand its content. With a technical site audit, you are reviewing these elements rather than the quality of the content itself.
Enter your URL and target keyword into our On-Page SEO Checker to review your pages and learn how to optimize them. Click on each opportunity in the list to see our detailed recommendations.
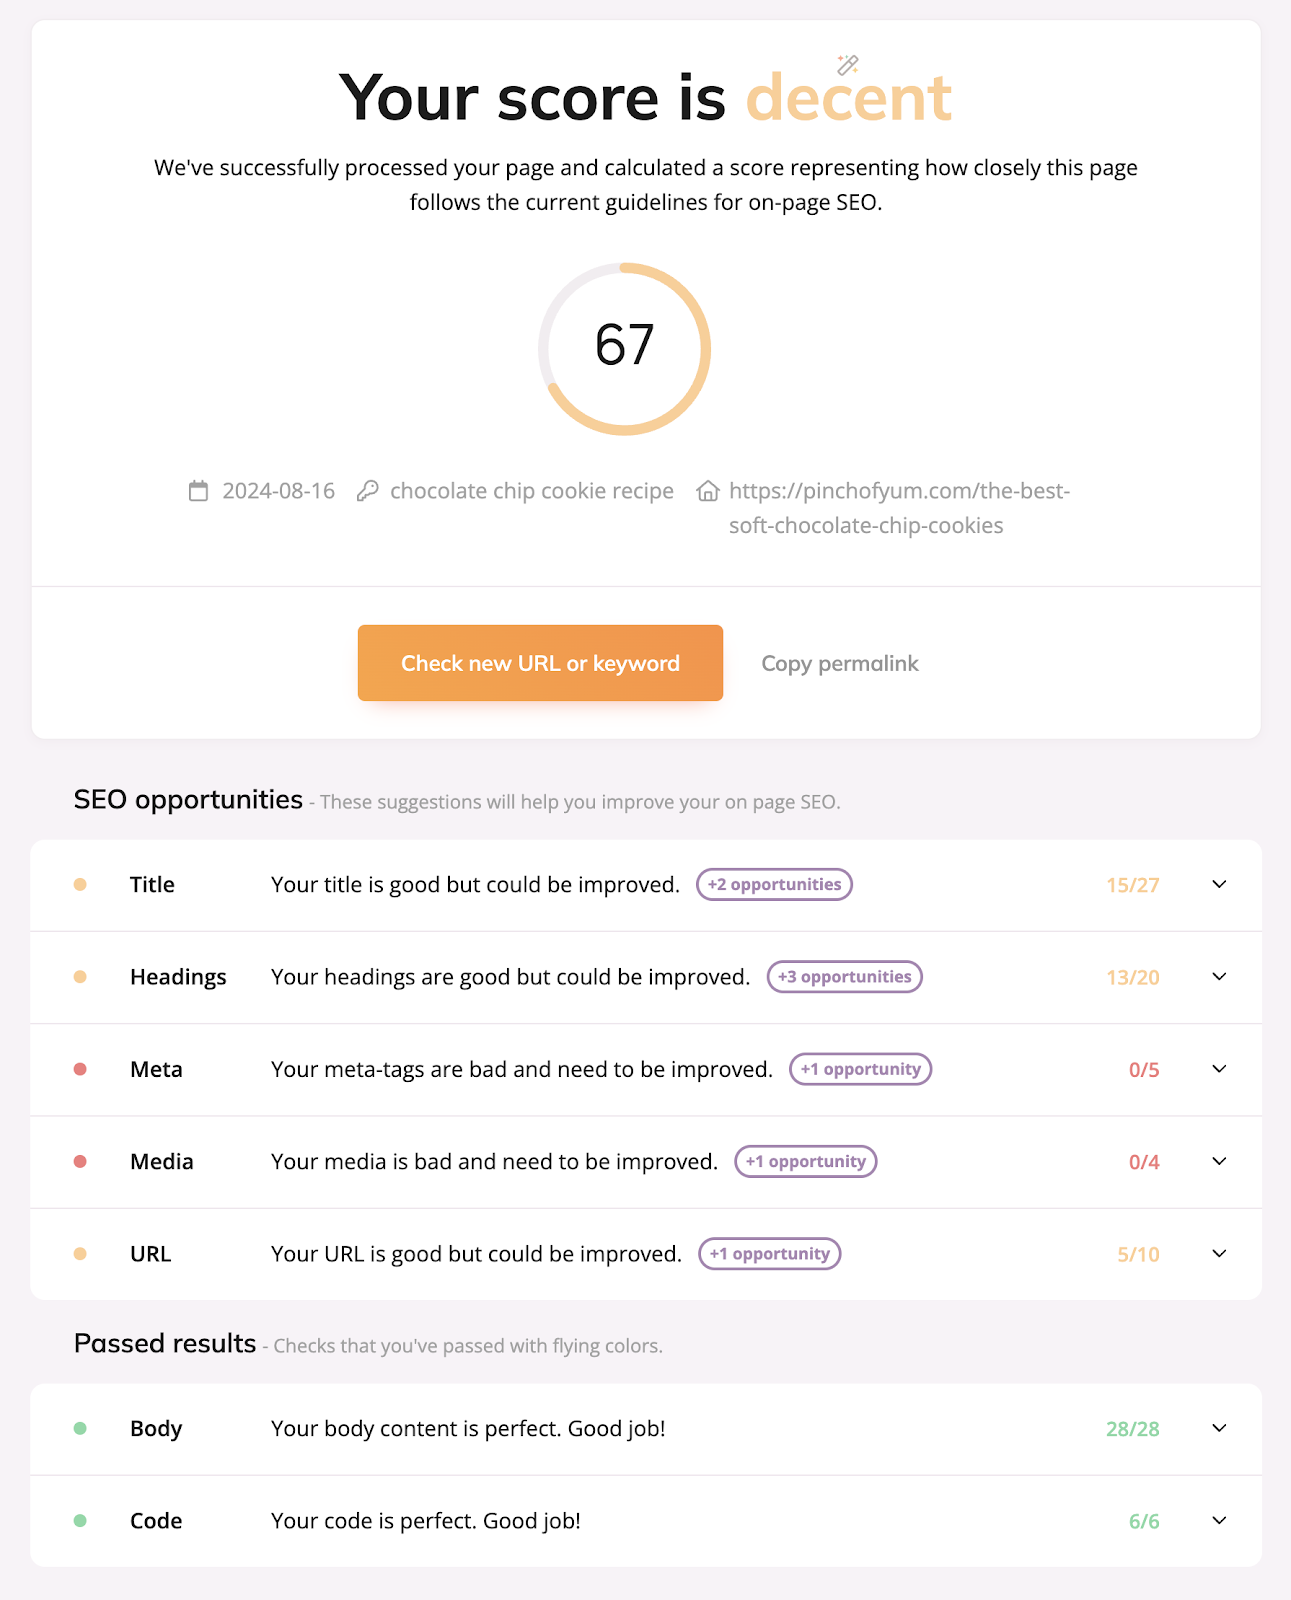
As a general rule of thumb, these are the elements to pay close attention to and guidelines to follow:
Duplicate content occurs when identical or very similar content appears on multiple URLs, either within your site or across different websites. When it comes to a technical audit, you’re looking for duplicate content across your website.
Not all duplicate content is bad. For example, having printer-friendly versions of your page can be valuable. The key is to guide search engines to the preferred version of your content so they understand these are intentionally duplicate pages and that you only want one to show in their index.
Other types of duplicate content can significantly impact your website’s ability to rank in SERPs, particularly when they cause keyword cannibalization.
Keyword cannibalization occurs when two pages on your website compete in SERPs for the same search term. This often happens when pages are published on similar topics and the content isn’t specific enough on each for search engines to understand that there is a different search intent behind them.
From Keywords Overview, you can quickly identify instances of keyword cannibalization across your website. Filter the report so it only shows results where a tracked keyword has more than two ranking pages, and select a result to review the positions in detail.
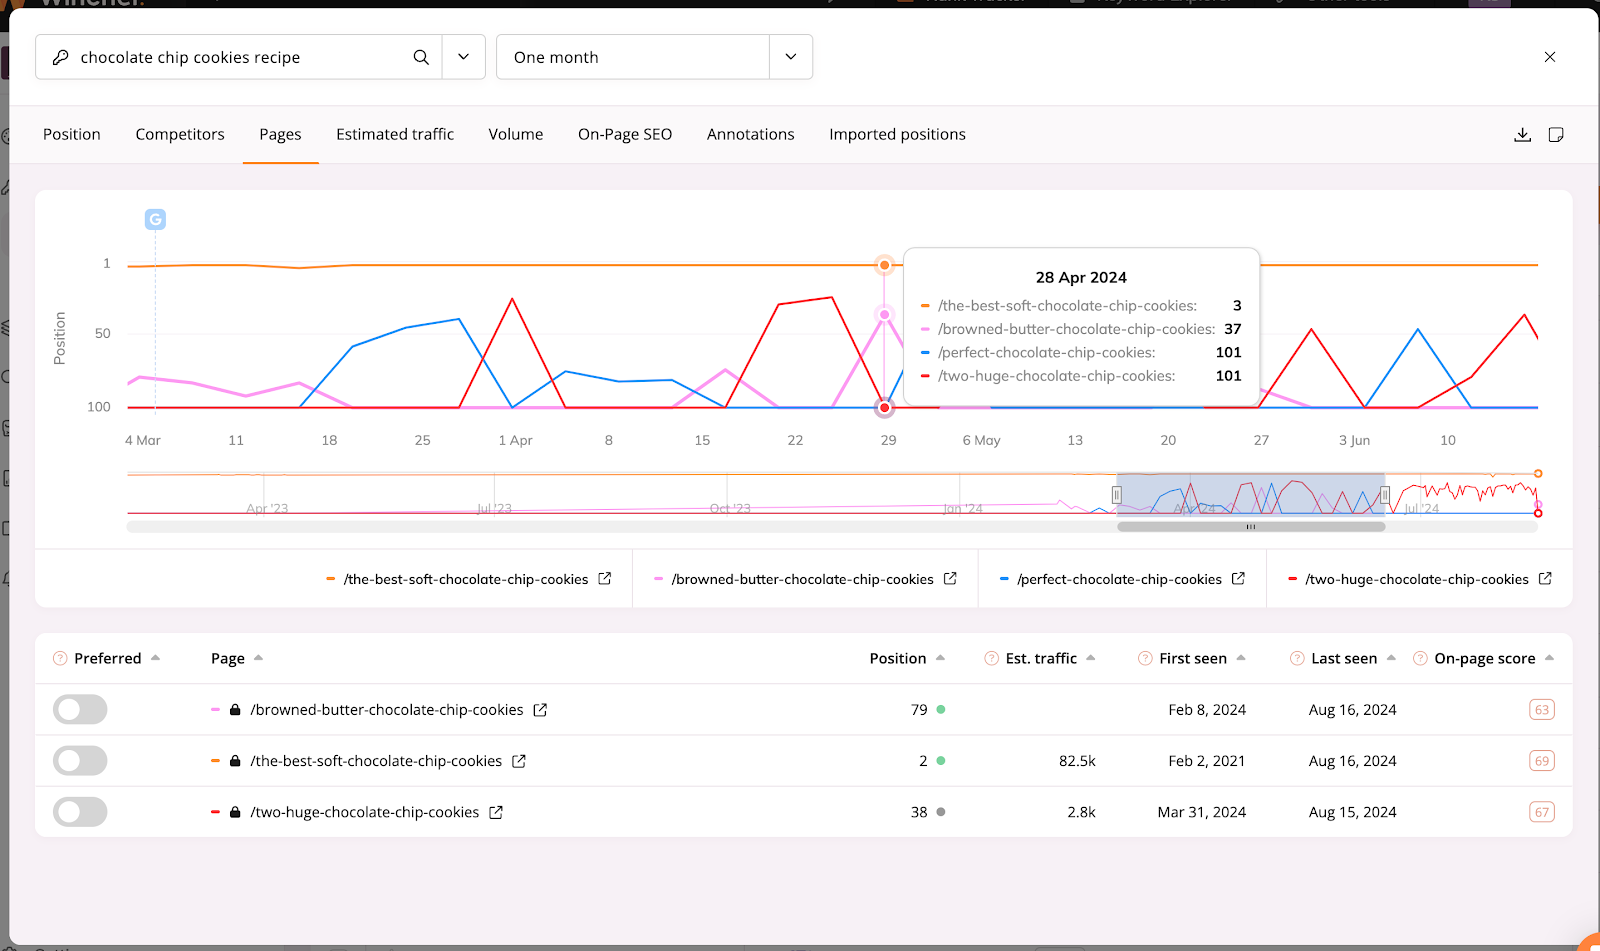
If you see the rankings for one page go up at the same time another page goes down, this indicates you have keyword cannibalization issues. Depending on what pages are showing in this report, you can take action to address this by:
We recommend you perform a full technical audit of your website at least twice a year, with regular check-ups in between. As you implement changes based on your findings, monitor your site’s performance closely with Google Analytics and Google Search Console to track improvements in rankings, organic traffic, and user engagement metrics.
Finally, while addressing technical issues holding back your website’s SEO potential is important, it’s just one piece of the puzzle. For the best results, combine the strong foundation of your technical optimizations with publishing high-quality content and a solid link-building strategy and watch your site climb up SERPs!